Wordpress - custom css

ADD CUSTOM CSS TO WORDPRESS
So you want to change this one small thing in your WordPress theme. How do you do it?
We’ll look at a couple of situations when using a plugin to add CSS makes the most sense and point you to some plugins you can use. But first, let’s review why using a child theme is usually preferred for adding custom CSS to your theme.
Reasons to add custom CSS with a child theme
At The Theme Foundry, we’re big fans of child themes. We even include ready-made child themes with every theme we sell, so you can tweak and tinker to your heart’s content from day one!
Regardless of how much we like child themes, it’s important to examine the circumstances behind your desire to customize and determine whether a child theme is the best way to add your changes. If either of the following situations apply to you, you should probably use a child theme to add custom CSS:
-
The CSS you want to add is specific to your current theme. More often than not, you’re only trying to change something about the theme you use right now – not one you may use in the future. In our experience, the CSS most WordPress users want to add is theme-specific, so using a child theme is the best way to refine a site’s look and feel without altering the core stylesheet.
-
You’re already using a child theme to add hooks or otherwise modify your theme’s core functionality. If you’ve already added PHP to your parent theme via a child theme, you may as well use the child theme to add custom CSS.
We think the first situation applies to most WordPress users trying to customize a theme. If it applies to you and the idea of using the WordPress Theme Editor doesn’t phase you a child theme is probably the way to go.
In the event you find the child theme concept intimidating, aren’t comfortable using the Theme Editor, or neither of the above scenarios applies to you, read on. We’re about to cover when you should use a plugin to add custom CSS.
Reasons to add custom CSS with a plugin
Now that we’ve extolled the virtues of child themes, let’s look at some situation-specific advantages of adding CSS with a plugin – and yes, there definitely are some!
For one thing, plugins are just downright accessible. It’s easy to install a plugin, activate it, and paste some CSS in a text box. What’s more, there may be situations where you want to apply the same CSS to more than one theme.
1. Ease of use
Your site’s primary navigation takes up too much space. You want to make it narrower, and you’ve located a line of CSS that, when applied to your theme, should help you achieve that.
After reading through the CSS basics, you’re still a little confused about what’s going on. You have no prior programming experience, so the concept of CSS is completely new and maybe a bit abstract for your skill level. Still, you advance to the next post to see how child themes work.
Now you’re really lost. The idea of having one theme sitting on top of another and using the Theme Editor to make changes seems completely bewildering – and you don’t want to make a mistake that could break your website.
If this sounds like you, it’s completely ok that you don’t “get” CSS. The beauty of WordPress is that you can have a fully customizable website without knowing how to code. In fact, it’s for WordPress users just like you that plugins made to add custom CSS exist at all. They’re super easy for non-coders to use because all you have to do is:
- Upload the plugin to WordPress and activate it.
- Navigate to the plugin options.
- Add your CSS to a text box and save it.
In your case, you’ve already got the line of CSS you need. You just need to paste it in the right spot, and a plugin can be a quick way to make that happen. We’ll look at some CSS plugins that follow this order operations in just a moment. First, let’s consider another situation that could warrant using a plugin to add custom CSS to your theme.
2. Making CSS persist across themes
Earlier, we mentioned that most users adding custom CSS will only want the CSS to apply to their current theme. But is it possible for the opposite to be true? Might there be a situation where you want the same custom CSS to apply even after you switch themes?
Say you’ve got some sharing buttons under your blog posts. The thing is, you don’t like that the buttons are left-aligned by default. You want them aligned to the right side of the page, and you’ve come up with some CSS that will help you put them there.
In this case, you want them right-aligned no matter what theme you’re using. Since you don’t want the changes to apply just to your current theme, using a plugin to add the CSS is a sensible choice. Any custom CSS added with a plugin will endure from one theme to the next, so you never have to update the CSS when you switch to a new theme.
Just remember that this potential advantage of plugins is also, for many WordPress users, one of plugins’ biggest pitfalls. If you only want the custom CSS to apply to your existing theme, use a child theme instead.
Plugins for custom CSS
If either of the above situations applies to you and you want to use a plugin to add custom CSS, you’re in luck. The Jetpack plugin comes standard with one-click WordPress installations from many major web hosts, so there’s a good chance you already have it. If you don’t, you can download it for free.
Jetpack, of course, offers a variety of features – the original idea was to give self-hosted WordPress users the same tools enjoyed by bloggers on WordPress.com. The ability to add custom CSS is just one of the many things Jetpack can do. You probably already have it installed, so go ahead and use it!
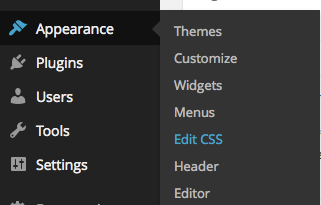
After activating the plugin and connecting it to a WordPress.com account (you will need to create one if you haven’t already; just follow Jetpack’s prompts), navigate to Appearance > Edit CSS from your WordPress Dashboard.

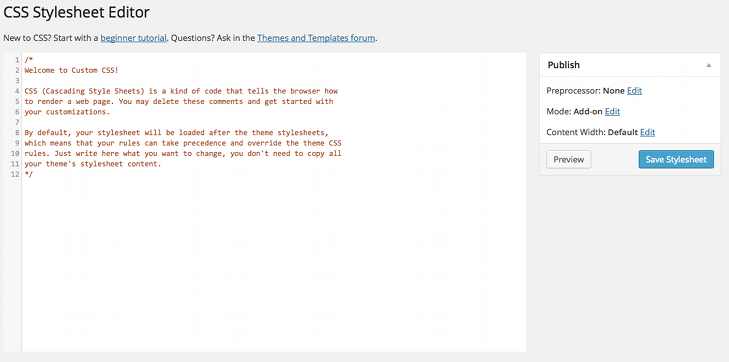
You will be greeted with this screen, which features a basic CSS editor.

Now all you have to do is paste your CSS directly below the default text. You can also delete the default text so that your CSS is the only thing that appears in the editor. Then click “Save Stylesheet,” and your CSS will be live.
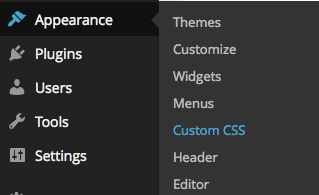
In the event you don’t already have Jetpack installed and would prefer a more lightweight plugin, check out the Simple Custom CSS plugin, which works very much the same way. After installing and activating the plugin, navigate to Appearance > Custom CSS.

After doing so, you’ll see a CSS editor similar to the one in Jetpack:

Just add your CSS, click “Update Custom CSS,” and your changes will be live.
To be sure, there are other plugins out there that will help you add custom CSS to your theme. We really don’t think you need to look beyond either of the two we’ve suggested. However, in the event you go with something else, all of the rules for adding plugins still apply. In particular, you should choose a plugin that’s compatible with the current version of WordPress and has recently received positive reviews.
The choice is yours.
Ultimately, the decision to use a child theme or a plugin to add custom CSS to your WordPress theme comes down to your specific circumstances and personal preferences. Either option will help you apply the customizations you’re after, but you should always be mindful of:
-
the theme or themes to which you’re adding the CSS: If you’re only adding it to your current theme and don’t expect to reuse the CSS when you switch to a different one, a child theme is probably the best method.
-
your skill level: Some users aren’t comfortable using the WordPress Theme Editor or don’t understand how it works. If that sounds like you, don’t worry! Either of the plugins we discussed in this post will let you copy and paste your CSS into a simple text box.
Now that you know how to add custom CSS to WordPress, go customize your design!